
Coming to New Zealand on a Working Holiday Visa (WHV) is exciting, but the first few days can feel overwhelming if you don’t know where to start.
There are few essential admin things to sort out in your first week or two. Some of these can be done pre-departure but it would be more complicated.
It’s easier to get these done once you’re on NZ soil in my opinion 🙂
Here’s my experience on setting up for your NZ WHV when you have arrived (IRD, Mobile Plan, Bank Account)
If you’re still preparing to apply for the NZ WHV, you might want to read my other blog on NZ WHV for Singaporeans first.
1. Get Your IRD Number
Your IRD number is your tax number in New Zealand. You’ll need it for anything related to work and pay and most jobs will require your IRD number on application.
This is the first thing I settled on the day I entered NZ.
How to apply: The IRD application can be done online on the Inland Revenue website
You will need:
- Passport
- Immigration New Zealand Application number
I managed to receive my IRD number within a day of applying. Highly recommend settling this first as it will allow you to start applying for jobs.
Another benefit is that once you have your IRD number you can use your IRD as proof of address when getting a bank account (more info the bank section).
2. Get a Local NZ SIM Card
The next thing I would recommend is getting a local NZ number as soon as you can. A local number will be needed for opening an NZ bank account, setting up mobile banking and OTP verification.
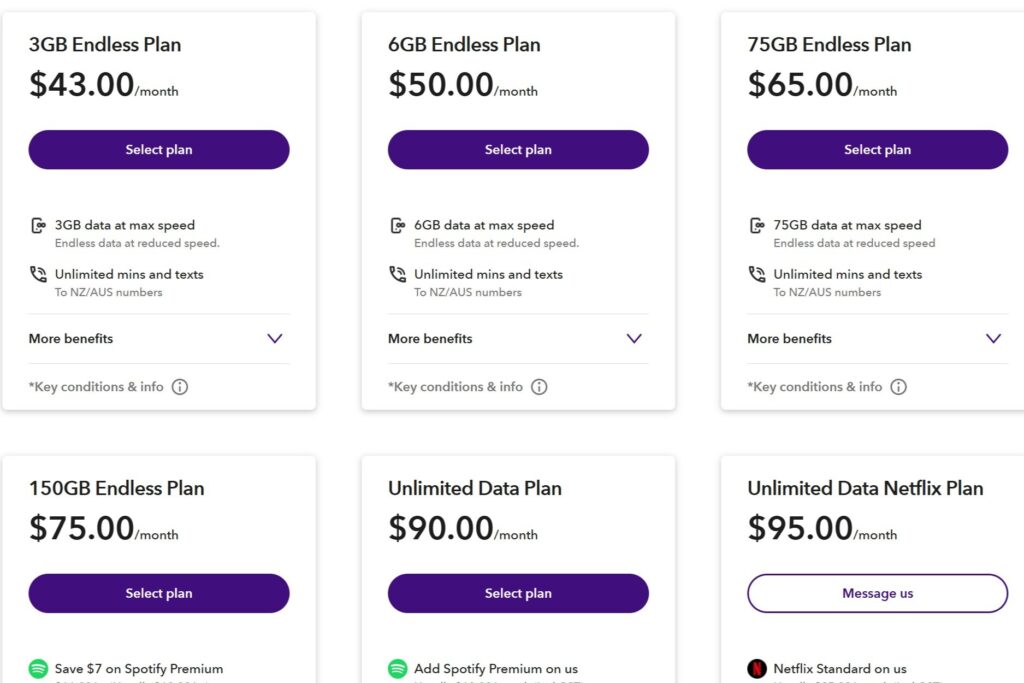
Unlike Singapore with SGD10 per month plans, monthly mobile plans in New Zealand are comparably more expensive.
An example of Spark NZ plans taken from their website Jan 2026:
New Zealand isn’t as Wi-Fi friendly as Singapore
NZ doesn’t have widespread, free public Wi-Fi everywhere. Especially in rural areas / small towns, you may need to rely on your mobile data.
In my experience road tripping around NZ staying mainly in holiday parks, while most offered free Wi-Fi, it was not always guaranteed and speed can be slow. Some of those that offered free Wi-Fi also had a cap on it (e.g. 1-5 GB per day).
How much data should you get?
This will depend heavily on your mobile phone usage and what you’re planning to do in NZ. Personally, we spent a lot of time moving around in NZ, which meant staying in small towns with no free Wi-Fi and WWOOFing in rural areas.
We got a 150GB high speed data plan with Spark NZ and never ran out of data while on the road and in rural areas. During times we stayed in a flatshare in bigger towns/cities, we could use it to watch YouTube when Wi-Fi in our accommodation was slow. I’ve not run out of data so far so it might be excessive but it offered more value compared to the lower tier.
Obviously, more data = more money and we were paying 115NZD per month for 2 pax. This is really on the more expensive side compared to other mobile plans I’ve seen available but it has worked well for us and we’re too lazy to change haha.
If you’re staying in an area with Wi-Fi in your accommodation, you probably won’t need so much data, I think 30GB may be sufficient.
In terms of coverage, I’ve not had any issues except once with very slow speed at a campsite near Taranaki.
Save money with shared plans
Many telcos in NZ offer shared plans, meaning a base rate + a cheaper rate to add another person. So the more people you have, the cheaper the plans become.
For the plan we used, it was 75NZD base + 40NZD add-on (115NZD) for 2 pax. Most plans allow a total of ~6 pax in a group plan.
There are cheaper mobile plan options, but we wanted to get our SIM card settled fast at the Airport. Prices, plans and promotions are always changing with time so recommend doing your own research on the plans various telcos are offering if you’re looking for the best deal. There are carriers who have physical stores and also options for mobile virtual network operator (MVNO) that usually offer cheaper rates but don’t have physical stores.
Common Telcos among WHV go-ers:
- Spark NZ (has physical store at Auckland airport)
- OneNZ (has physical store at Auckland airport)
- Rocket Mobile (MVNO)
- Mighty Mobile (MVNO)
- Kogan Mobile (MVNO)
3. Open a New Zealand Bank Account
During your time in New Zealand, you will need a local bank account to receive wages and for everyday spending. There are many bank brands in New Zealand.
As I wasn’t planning on getting a corporate job and was mainly just going to do minimum wage work once in a while, my main priority was choosing a bank that could get the bank set up easy and fast.
My experience setting up a bank account with BNZ:
I walked into a BNZ branch and was told that bank accounts can only be applied online first, only after will I need to come down to the branch physically for verification with my passport. Weird, because like I was already there at the bank and they couldn’t open it for me but it’s just a process thing.
My account was set up within 2 days after I applied online. But I did have to wait for them to send the debit card to me via post to my Airbnb address. When I asked if I could come in to collect it on my own, they said only by post so that’s something to keep in mind when booking your first accommodation as well.
This might potentially vary with the bank branch and staff working as I’ve heard about others who managed to get their bank card sent to the bank branch and they could collect it from there.
EFTPOS vs Debit Card: I was offered the option to get an EFTPOS card while waiting for the debit card to arrive which I took since it was free. EFTPOS is like the NZ version of NETS where you swipe/insert card and type your pin. Some places have surcharges for paywave (ApplePay/Debit card) so I mostly used the EFTPOS card in-stores anyway.
This might not be an issue in future as surcharges on local NZ cards may get banned from May 2026.
WHV Bank Account Timeline overview: Account opened in 2 days, Debit card arrived 8 days after opening
- 16 July – Submitted online application
- 17 July – Received request to visit BNZ bank branch with passport
- 17 July – Went down to bank branch, account opened, got my EFTPOS card
- 24 July – Received BNZ debit card *not sure how many days it took exactly to arrive as I had to rely on my Airbnb host to pass it to us and im not sure how often they checked their mail
Proof of Address for Bank Account
I used IRD for proof of address with BNZ and it seems to be the most simple, straightforward way to settle this with other banks as well. Experiences from others also seem to vary based on which bank they apply with and type of accommodation they stay in. For e.g. i’ve heard ANZ doesn’t accept Airbnb as proof.
There are other options such as getting a proof of address from the hostel reception if you’re staying at a hostel that seems to be the next easiest option.
Which Bank to Choose?
My experience is only with BNZ. However, this is what I’ve heard about the application from other banks but note that things may have changed and it seems to vary based on individual experience (bank branch, staff etc)
- BNZ: refer to my experience as above!
- ANZ: Heard of long wait to get an appointment, more strict with proof of address (e.g. don’t accept Airbnb address)
- Kiwibank: Heard of people being able to walk-in and get it settled within the day
3. Buy a Car
If you’re planning to drive and travel around New Zealand, this will be the biggest purchase you make during your time here. For those who plan on car camping, this will even become your home.
In New Zealand, it is very possible to buy and own a second hand car for <10k NZD. There are many things to consider when buying a second hand car. It’s long enough to be a blog on its own so I’ll cover it in the next blog sharing our experience buying a second hand car in New Zealand.